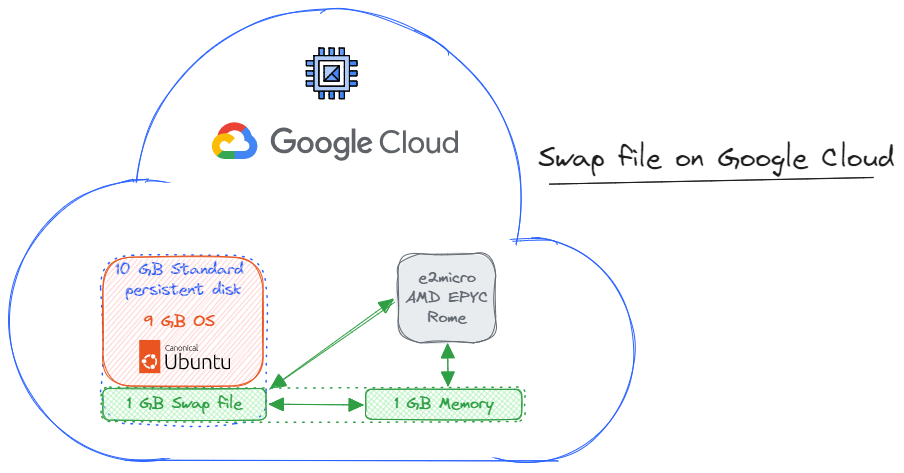
Add swap file on Ubuntu for Ghost on Google Cloud
Solve MySQL ran "out of memory" error on self-hosted Ghost on GCP free tier
Swap is a dedicated partition or a file on a hard drive or other storage device that is used by the operating system as an extension of physical memory. When the system runs out of physical memory, it can move inactive pages of memory to the swap file to free up space. This allows the system to continue running even when it has more processes running than it has physical memory for.
Why should a swap file be used on Ubuntu on Google Cloud free tier?
The free tier Google Cloud Compute Engine instances have 1GB RAM only, the minimum required for Ghost, and MySQL may run out of memory. A swap file can help to prevent this by providing a safety net for the operating system to use when it runs out of physical memory.
What is the appropriate size for a swap file on Ubuntu on Google Cloud?
A good rule of thumb is to create a swap file that is equal to the size of your system's physical memory. For example, if you have a 1GB Compute Engine instance, you would create a 1GB swap file. However, you may want to create a larger swap file if you are running a large number of applications or if you are using a lot of memory.
To add a swap file to Ubuntu 22.04, follow these steps:
- Check the system for swap information.
Use the following command to check if you have any existing swap space:
sudo swapon --show
If you don't see any output, it means that you don't have any existing swap space. To verify run:
free -h
- Check available space on the hard drive partition.
Use the following command to check the available space on your hard drive partition:
df -h
This will show you a list of all the mounted partitions on your system, along with the amount of free space on each partition.
- Create a swap file.
Use the following command to create a swap file:
sudo fallocate -l 1G /swapfile
This will create a 1GB swap file called /swapfile. You can change the size of the swap file to suit your needs. To verify run:
ls -lh /swapfile
- Enable the swap file.
Use the following command restricting the swap file access to root only:
sudo chmod 600 /swapfile
This will format the swap file and make it ready to use. To verify run:
ls -lh /swapfile
Mark the file as swap space:
sudo mkswap /swapfile
Enable the swap file to allow the system to use it:
sudo swapon /swapfile
Verify the availability of the swap file:
sudo swapon --show
To confirm run:
free -h
- Make the swap file permanent.
To make the swap file permanent, you need to add it to the /etc/fstab file. This file specifies which partitions are mounted on startup.
Create a backup of the /etc/fstab file:
sudo cp /etc/fstab /etc/fstab.bak
Add the swap file at the end of the /etc/fstab file:
echo '/swapfile none swap sw 0 0' | sudo tee -a /etc/fstab
- Verify that the swap file is active.
Use the following command to verify that the swap file is active:
swapon --show
You should see the swap file listed in the output.
- Reboot your system.
For the changes to take effect, you need to reboot your system.
Once you have rebooted your system, the swap file will be active and you can start using it.
Tuning swap settings
The default swap settings in Ubuntu are usually fine for most users. However, if you are running a large number of applications or if you are using a lot of memory, you may want to increase the size of your swap file or adjust the swap priority and cache pressure.
Cache pressure is a measure of how much the system is using its cache. The higher the cache pressure, the more the system is relying on its cache to store frequently accessed data. This can lead to performance improvements, but it can also lead to problems if the cache is not large enough or if the system is not configured correctly.
There are two main types of cache pressure:
- Read cache pressure: This is the pressure on the cache caused by read requests. When the system needs to read data from memory, it first checks the cache. If the data is in the cache, the system can access it much faster than if it had to read it from disk.
- Write cache pressure: This is the pressure on the cache caused by write requests. When the system needs to write data to memory, it first writes the data to the cache. This allows the system to continue running even if the data has not yet been written to disk.
There are a number of factors that can affect cache pressure, including:
- The size of the cache.
- The types of applications that are running.
- The amount of memory that is available.
- The workload of the system.
If the cache is too small, the system will have to write data to disk more often, which can lead to performance problems. If the cache is too large, the system may be wasting memory that could be used for other purposes.
To configure cache pressure on Ubuntu, you can use the following sysctl parameters:
-
vm.vfs_cache_pressure: This parameter controls the tendency of the kernel to reclaim memory from the VFS caches. Increasing the value of this parameter will cause the kernel to reclaim more memory from the VFS caches, which can improve performance for applications that are sensitive to cache pressure. -
vm.swappiness: This parameter controls how aggressively the kernel swaps out anonymous memory relative to pagecache and other caches. Increasing the value of this parameter will cause the kernel to swap out more anonymous memory, which can free up more memory for the cache.
It is important to note that changing these parameters can have a significant impact on the performance of your system. It is important to test any changes carefully before making them permanent.
Here are some general guidelines for configuring cache pressure on Ubuntu:
- If you are running a large number of applications that are sensitive to cache pressure, you may want to increase the value of the
vm.vfs_cache_pressureparameter. - If you are running a system with a lot of memory, you may want to decrease the value of the
vm.swappinessparameter. - If you are unsure what values to use for these parameters, it is best to leave them at their default values.
You can use the following command to view the current values of the vm.vfs_cache_pressure and vm.swappiness parameters:
sysctl vm.vfs_cache_pressure vm.swappiness
To adjust the swap priority, you can use the vm.swappiness kernel parameter. The default swap priority is 60, which means that the system will start using swap space when the memory usage reaches 60%. As the swap priority value approaches zero, the kernel will not swap data to the disk unless absolutely necessary.
To decrease the swap priority, you can set the vm.swappiness kernel parameter to a lower value. For example, to set the swap priority to 10, you would use the following command:
sudo sysctl vm.swappiness=10
To make the change permanent, you can add the following line to the /etc/sysctl.conf file:
sudo nano /etc/sysctl.conf
Add at the bottom:
vm.swappiness=10`
Save and close the file.
To change the pressure, you can use the following command:
sudo sysctl -w vm.vfs_cache_pressure=50
This command will set the value of the vm.vfs_cache_pressure parameter to 50.
To make the change permanent, you can add the following line to the /etc/sysctl.conf file:
sudo nano /etc/sysctl.conf
Add at the bottom:
vm.vfs_cache_pressure=50
Save and close the file. The changes will take effect after you reboot your system. To verify run the following command after restart:
sysctl vm.vfs_cache_pressure vm.swappiness
Removing a swap file
To remove a swap file, simply follow these steps:
- Deactivate the swap file:
sudo swapoff /swapfile
- Remove the entry for the swap file from the
/etc/fstabfile:
sudo nano /etc/fstab
Locate the line that contains the swap file information and delete it.
- Remove the swap file:
sudo rm /swapfile
Once you have removed the swap file, you need to reboot your system for the changes to take effect.
Summary
Swap file can help prevent out of memory errors when hosting Ghost on a free instance, however Memory (RAM) is much faster than a swap file. This is because memory is made of solid-state components, while swap files are stored on hard disk drives (HDDs) or solid-state drives (SSDs). HDDs and SSDs are much slower than memory, so swapping data between RAM and a swap file can significantly reduce performance.
In general, the more memory your instance has, the less it will need to use the swap file. This is because the operating system will be able to keep more data in memory, which means that it will not need to swap out as much data to the swap file.
If your instance does not have enough memory, it will start to use the swap file more frequently. This can lead to a noticeable decrease in performance, as the operating system will have to spend more time swapping data between RAM and the swap file.
Here is a table that summarizes the key differences in performance between memory and swap file:
| Feature | Memory | Swap file |
|---|---|---|
| Speed | Very fast | Much slower |
| Access time | Nanoseconds | Milliseconds |
| Volatility | Loses data when power is turned off | Retains data when power is turned off |
| Capacity | Limited by the amount of physical memory | Limited by the amount of disk free space |