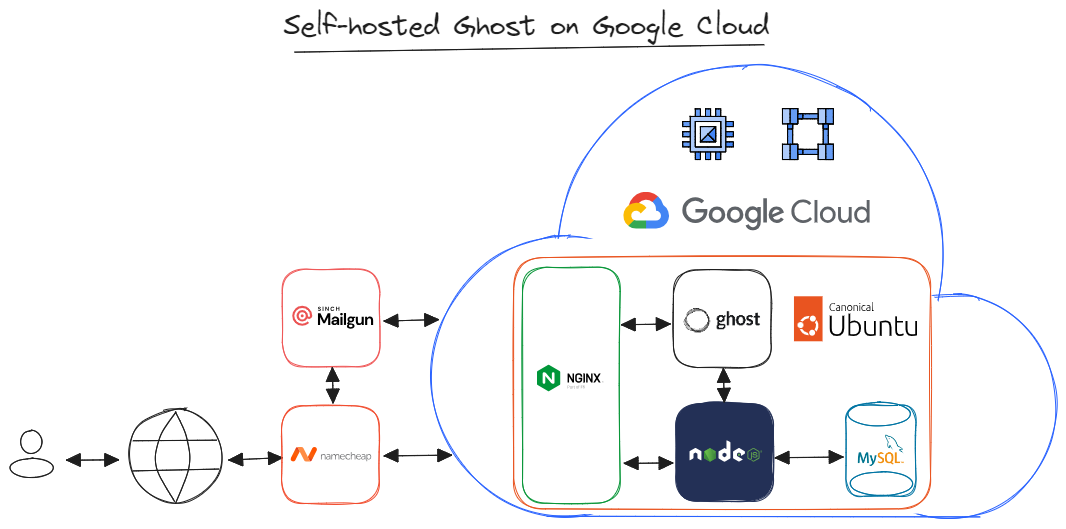
How to install Ghost on Google Cloud for free
A full guide for installing, configuring and running Ghost on a Google Cloud Platform, for free use in production environments.
Building and maintenance of a website is non-trivial, no matter which language or stack you choose. It is almost like building your custom car and being the car mechanic when it breaks. I still do it, however, for publishing I found Ghost to be the best alternative out there, here is why 👉 https://ghost.org/alternatives/
Ghost is also inexpensive when compared to your time-investment or using any alternative. If you have a large subscriber base and you are generating revenue, supporting Ghost is your next best investment.
However, if you are just starting, Ghost is open-source and you can install it on your own server at home or spin it online for free at Fly.io, Oracle Cloud or Google Cloud. In this blog I will show you how to do it on Google Cloud.
Prerequisites
- Google Cloud free-tier account to host:
- Server (at least 1GB memory)
- Ubuntu 22.04 (or 16.04, 18.04, 20.04)
- NGINX (minimum of 1.9.5 for SSL)
- Node.js (see supported versions)
- MySQL 8
- Systemd
- Domain name pointing to the server's IP
- Bulk email delivery service for newsletters
1. Create Google Cloud account
1.1. Set up account
- Go to https://console.cloud.google.com > Sign in.
- Click
Try for free> Create Payment profile. - Enter
Create a projectand select the top result in the Search bar:- Project name:
ghost-free - Location:
No organization
- Project name:
- Click
ActivateFree trial, in the floating topbar. Create billing account. - Click
Activatea paid account, in the floating topbar, to protect your project from removal after the 90-day trial period. - Go to Billing > Budgets & alerts >
Create budget:- Name:
ghost-free-budget - Time range:
Monthly - Budget type:
Specified amount - Target amount:
3.00 - Manage notifications:
Email alerts to billing admins and users - Click
Finish, this project will run on the free tier, nevertheless it is prudent to enable monitoring.
- Name:
1.2. Spin up a web server
- Enter
Compute engineand select the top result in the Search bar:- Click
Enable API>Enable billing - Select >
My billing account> clickSet account
- Click
- Click
Create Instance> SelectNew VM instance from template> ClickCreate instance template:- Name:
ghost-free-web-server - Machine configuration:
General-purpose - Series:
E2 - Machine type:
e2-micro (2 vCPU, 1 core, 1GB memory) - Boot disk >
Change:- Operating system:
Ubuntu - Version:
Ubuntu 22.04 LTS (x86/64, amd64) - Boot disk type:
Standard persistent disk
- Operating system:
- Firewall:
Allow HTTP trafficAllow HTTPS traffic
- Advanced Options > Networking >
Network tags:- Type
mailthen pressEnter
- Type
- Security:
- Turn on
Secure Boot,vTPM, andIntegrity Monitoring - Click
Create
- Turn on
- Name:
- Click
New VM instance from template:- Select:
ghost-free-web-server - Name:
ghost-free - Region:
us-west1 (Oregon)(see more at https://cloud.google.com/free/docs/free-cloud-features#compute) - Advanced options > Security > Check
Turn on Secure Boot,vTPM, andIntegrity Monitoring - Click
Create
- Select:
- Enter
Snapshotsand select the top result in the Search bar:- Select
Snapshot Schedule - Click
Create Snapshot Schedule - Name:
weekly-backup-schedule - Schedule location:
us-west1(the same region as your instance) - Snapshot storage location:
Regional - Location:
us-west1 - Schedule frequency:
Weekly - Click
Create
- Select
- Go to Disks >
ghost-free>Edit:- Snapshot schedule:
weekly-backup-schedule
- Snapshot schedule:
1.3. Initialize VPC Network
- Enter
VPC networksand select the top result in the Search bar:- Go to Firewall >
Create Firewall Rule: - Name:
allow-outgoing-587 - Logs:
Off - Direction:
Egress - Action on match:
Allow - Targets:
Specified target tags>mail - Destination filter:
IPv4 ranges>0.0.0.0/0 - Protocols and ports:
Specified protocols and ports>TCP:587 - Click
Create
- Go to Firewall >
- Enter
IP addressesand select the top result in the Search bar:- Go to IP addresses >
Reserve External Static Address: - Name:
ghost-free-ip - Network service tier:
Standard - Region:
us-west1(the same region as your instance) - Attached to:
ghost-free - Click
Reserve
- Go to IP addresses >
- Select and copy
IP Addressassigned toExternalAccess type.
2. Get domain name and set up Mailgun
2.1. Register a domain name
- Go to https://www.namecheap.com > buy a domain. For example, ghostfree.com. Replace
ghostfree.combelow with your own domain name. - Click
Manage>Advanced DNS: - Then
Add new record: - Type:
A - Host:
@ - IP address: paste
ExternalIP address from GCP > IP Address - Click >
Save all changes - Toggle on
DNSSEC
2.2 Set up email delivery system
- Go to https://www.mailgun.com > Get started for free > enter
Payment information> selectFoundation Trial - Click
Dashboard> go to yourProfile>Plan & Billing> click ⚙️ icon>Unsubscribeswitching toFlex plan(free, if you send less than 1,000 emails/month), more details at: https://help.mailgun.com/hc/en-us/articles/360048661093-How-does-PAYG-billing-work- - Go to
Sending>Domains> clickAdd new domain:- Domain name:
mg.ghostfree.com - Click
Add domain - DNS records > copy
SPF,DKIM,MXandCNAMErecords - Go to Namecheap > paste/create new records for Mailgun
- Go back to Mailgun >
Verify DNS records
- Domain name:
- Go to
Sending>Domain Settings>SMTP credentials> copy login emailpostmaster@mg.ghostfree.com> clickReset Password> save credentials in your password manager. - Go to your
Profile>API security> Mailgun API keys > click go to yourAdd new key> copy key and store in your password manager.
3. Install Ghost on Ubuntu
3.1. Set up VM instance
- Go to Google Cloud > enter
VM instancesand select the top result in the Search bar: - Click
SSHto open secure shell in a pop-up window. - Set a password for the root user:
sudo passwd - Switch to root user and authenticate:
su - Update Linux:
apt update && apt -y upgrade - To allow any updated services to restart, go back to Google Cloud,
StopandResumethe instance, thenSSHagain. - Make a new user called
service_accountand grant it sudo:adduser service_account && usermod -aG sudo service_account - Set a password for
service_account. Leave default user information fields forservice_account. Confirm withY. - Switch to
service_account:su - service_account
3.2. Install Ghost dependencies
- Install Nginx and open the firewall:
sudo apt install -y nginx && sudo ufw allow 'Nginx Full' - Install
NodeJS:sudo apt update sudo apt install -y ca-certificates curl gnupg sudo mkdir -p /etc/apt/keyrings curl -fsSL https://deb.nodesource.com/gpgkey/nodesource-repo.gpg.key | sudo gpg --dearmor -o /etc/apt/keyrings/nodesource.gpg NODE_MAJOR=18 echo "deb [signed-by=/etc/apt/keyrings/nodesource.gpg] https://deb.nodesource.com/node_$NODE_MAJOR.x nodistro main" | sudo tee /etc/apt/sources.list.d/nodesource.list sudo apt update sudo apt install nodejs -y sudo npm install -g npm@latest - Install MySQL:
sudo apt install -y mysql-server - Clean up:
sudo apt -y autoremove - Stop the
snapdprocess to save on RAM:sudo systemctl stop snapd.service - Start MySQL in modified mode:
sudo systemctl set-environment MYSQLD_OPTS="--skip-networking --skip-grant-tables" sudo systemctl start mysql.service sudo mysql -u root - This will load the MySQL command line. Enter:
FLUSH PRIVILEGES; USE mysql; ALTER USER 'root'@'localhost' WITH mysql_native_password identified BY 'yourpasswordhere'; QUIT; - replacing
yourpasswordherewith your chosen MySQL root password. - Restart MySQL and switch to production mode. Run:
sudo systemctl unset-environment MYSQLD_OPTS sudo systemctl revert mysql sudo killall -u mysql sudo systemctl restart mysql.service sudo mysql_secure_installation - then configure as follows:
- Install validate password component? —
N - Remove anonymous users? —
Y - Disallow root login remotely? —
N - Remove test database and its privileges? —
Y - Reload privilege tables? —
Y
- Install validate password component? —
- Access MySQL:
sudo mysql -u root - This will load the MySQL command line. Enter:
CREATE USER 'user_site'@'localhost' IDENTIFIED BY 'yourpasswordhere'; CREATE DATABASE site_prod; GRANT ALL PRIVILEGES ON site_prod.* TO 'user_site'@'localhost'; FLUSH PRIVILEGES; QUIT; - replacing
yourpasswordherewith your chosen MySQL root password. - Turn off MySQL’s performance schema to reduce memory usage:
sudo nano /etc/mysql/my.cnf - then add the following lines at the bottom of the file:
[mysqld] performance_schema=0 - then
Ctrl-X>Y>Enterto save and quit. - Restart MySQL and log in:
sudo /etc/init.d/mysql restart sudo mysql -u root -p - Then in the MySQL command line, run:
show variables like 'performance_schema'; - Verify that the
performance_schemavariable is indeedOFF, thenquit;
3.3. Set up Ghost
- Install Ghost CLI:
sudo npm install ghost-cli@latest -g - Make a new directory called
ghost, set its permissions, then navigate to it:sudo mkdir /var/www/ghost` sudo chown service_account:service_account /var/www/ghost sudo chmod 775 /var/www/ghost - Navigate to the website folder and install Ghost:
cd /var/www/ghost && ghost install - then configure as follows:
- Blog URL:
https://ghostfree.com - MySQL hostname:
localhost - MySQL username:
root - MySQL password: the password you set for
root - Ghost database name:
ghost_prod - Set up Ghost MySQL user? —
Y - Set up NGINX? —
Y - Set up SSL? —
Y, then enter your email - Set up systemd? —
Y- If you entered a value wrong, interrupt with
Ctrl + Cthen runghost setup, otherwise:
- If you entered a value wrong, interrupt with
- Start Ghost? —
Y
- Blog URL:
- Ghost is live at:
https://ghostfree.com/ghost
3.4. Set up Mailgun on Ghost
- While still inside
/var/www/ghost, run:sudo nano config.production.json - and update the
"mail"section as follows, using spaces (not tabs) to indent:"mail": { "transport": "SMTP", "options": { "service": "Mailgun", "host": "smtp.mailgun.org", "port": "587", "secure": false, "auth": { "user": "your-mailgun-username", "pass": "your-mailgun-password" } } }, - replacing
"your-mailgun-username"and"your-mailgun-password"with your Mailgun SMTP credentials and host domain. - Then
Ctrl-X>Y>Enterto save and quit. - Restart Ghost for the config to take effect:
ghost restart
4. Configure email newsletter
- Go to
https://ghostfree.com/ghost. Create your admin login credentials. - Customize your site > click ⚙️ icon > Email newsletter >
Mailgun settings> clickEdit:- Mailgun region:
US(from Mailgun > Domain Settings > SMTP credentials) - Mailgun domain:
mg.ghostfree.com - Mailgun Private API key:
your-API-key
- Mailgun region:
5. Future maintenance
5.1 Enable Ghost auto-start
- Cron job to restart Ghost, whenever the virtual machine restarts.
- From the home directory of
service_account, run:crontab -e - and press
1to select Nano as your text editor. - Paste the following into the cronfile:
@reboot cd /var/www/ghost && /usr/bin/ghost start - then
Ctrl-X>Y>Enterto save and quit.
5.2. Create maintenance scripts
- Create an update script in the home directory of
service_account:cd && sudo nano update-ghost.sh - Paste the following text into the update script:
sudo apt update && sudo apt -y upgrade sudo apt clean && sudo apt autoclean && sudo apt autoremove sudo npm install -g npm@latest sudo rm -r /usr/lib/node_modules/ghost-cli cd /var/www/ghost sudo npm install -g ghost-cli@latest sudo find ./ ! -path "./versions/*" -type f -exec chmod 664 {} \; ghost backup ghost stop ghost update ghost ls ghost start sudo reboot - then
Ctrl-X>Y>Enterto save and quit. - Make it executable:
sudo chown service_account:service_account update-ghost.sh sudo chmod 775 update-ghost.sh - In the future, to keep Ghost up date, go to Google Cloud > enter
VM instancesand select the top result in the Search bar: - Click
SSHto open secure shell in a pop-up window.su - service_account ./update-ghost.sh - Note that
ghost backuprequires your Ghost admin credentials.
Conclusion
In this blog post, I have shown you how to install Ghost on GCP for free. By following these steps, you can create a self-hosted Ghost blog that is both powerful and affordable.
Additional notes
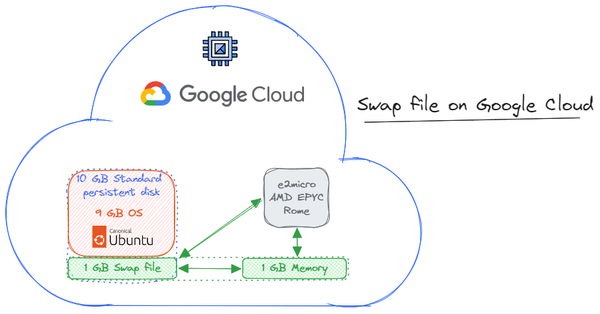
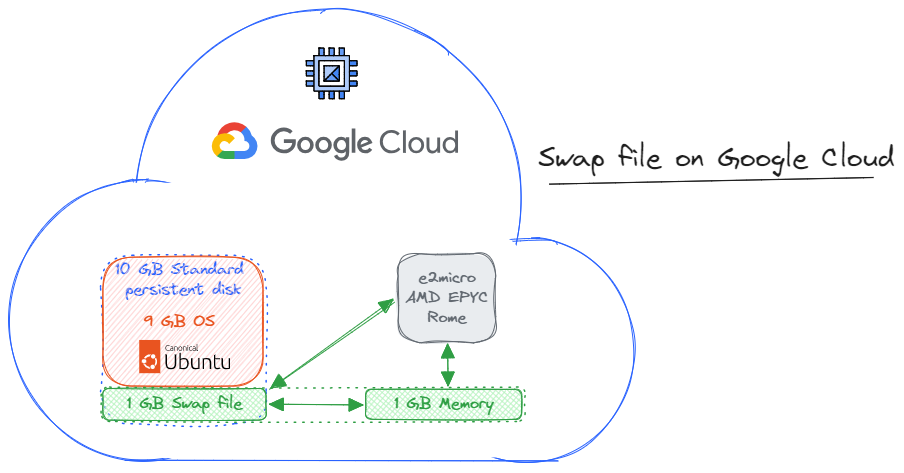
- The e2-micro machine type is eligible for the GCP Free Tier. This means that you can run your Ghost blog for free for up to 750 hours per month.
- To prevent out-of-memory errors try adding a swap space to your server.
- For more information on installing Ghost, please refer to the Ghost documentation and the following links 👇
References

Ghost on Ubuntu
Swap file on Ubuntu